How to Clean Teak Decking

At Teakdecking Systems, we replace many teak decks that are damaged by improper maintenance. Remarkably, many of these decks were destroyed not through neglect, but because they were cleaned too often, too thoroughly, or too aggressively. Proper cleaning prevents damage, so read on to learn from the experts how to clean teak decks.

Before & After Cleaning with ECO-Cleaners from Teak Decking Systems

RULE #1
SCRUB ACROSS THE GRAIN

Scrub wood across the grain with a soft scrubbing pad or a soft bristle brush using a gentle cleanser (like ECO-100 or ECO-300 Cleaners), then rinse well with water. Scrubbing with the grain tears teak’s soft grain from the planks, creating a rough surface with ridges in the teak. A rough, weathered deck will collect debris and trap water where mold and mildew can develop.

For large areas, the use of rotary cleaning machines with dispenser tanks and soft bristle brushes is appropriate.


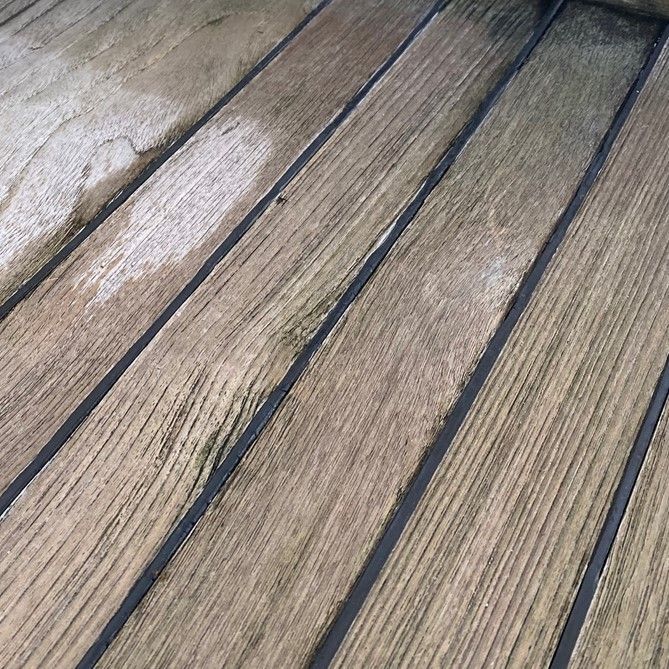
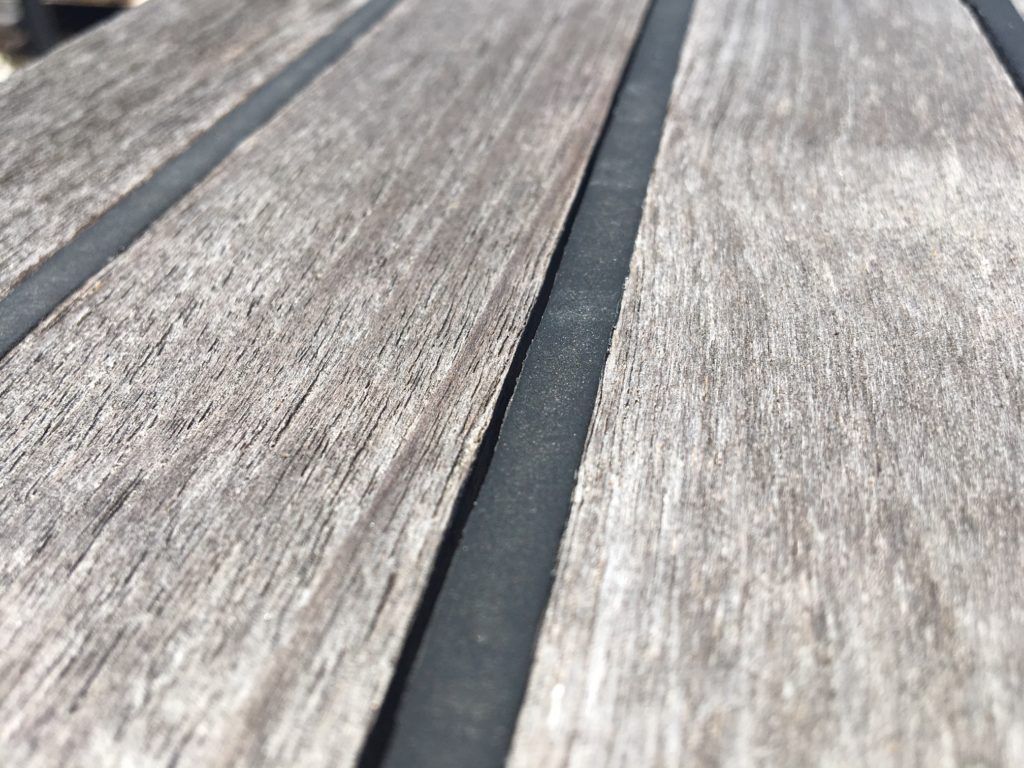
Rough weathered deck with teak ridges (this deck is ready for replacement)

SANDING

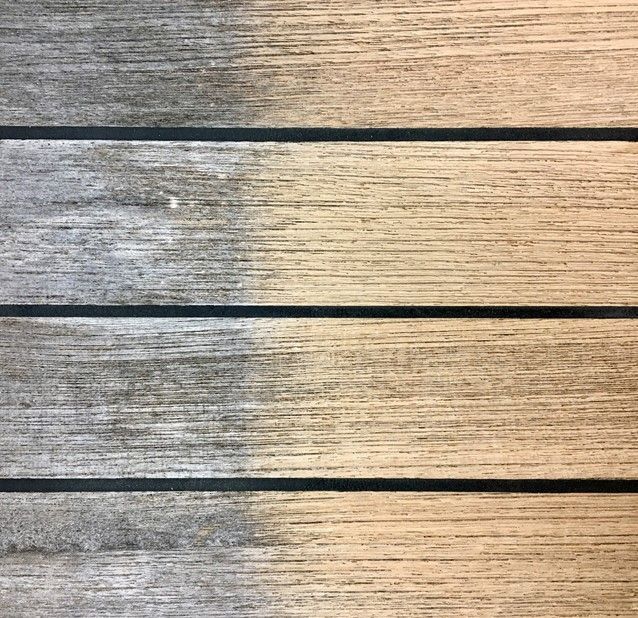
Even with proper care, ridges can develop in the wood over time. When this happens, lightly sand the deck to smooth the surface. Furthermore, this will actually increase the life of the deck because a smooth surface prevents the grain from trapping dirt.


Before Sanding


After Sanding


INSPECT THE DECK AFTER CLEANING

After cleaning and flushing the deck, check its condition. Look for any areas that remain wet after the rest of the deck has dried. Wetness may indicate a spot where the caulking in a seam has broken away from the teak, or a plug is failing. If so, repair these areas immediately to prevent water from getting under the deck. Once water is under the teak, a number of consequences can occur.

NOTE: If you can’t make an immediate repair, duct tape the opening to seal it temporarily.


RULE #2
DO NOT USE TWO-PART CLEANERS

UNLESS ABSOLUTELY NECESSARY

Overuse, or improper use, of two-part caustic acid cleaners, shortens the life of teak decks by eating away the teak. Only use these cleaners when everything else has FAILED. Then follow the instructions carefully for the two-part cleaner, and be sure to use personal protective equipment (PPE) to safeguard skin (hands, arms, bare feet, legs) and eyes.

The caustic cleaner will attack surrounding paint, so protect it by wetting down the surfaces before starting and continuing to flush them during the cleaning process. (This is not a 100% guarantee of no paint damage.) Additionally, remember to flush topsides below scuppers and drains to prevent damage to the paint as the deck drains down the side of the hull.

If a two-part cleaner is necessary, be sure to rinse the deck thoroughly. Any remaining cleaner will continue to “eat” the teak and surrounding surfaces. Remember – a two-part cleaner is an acid, and it is not recommended unless necessary.

RULE #3
BE CAREFUL USING CHLORINE BLEACH

Chlorine bleach will attack most caulking products (making them thick and sticky) and will damage seam integrity. However, SIS-440 Teak Deck Caulking is specially formulated for teak decks and is resistant to bleach. For SIS-440, only the top layer of the caulk (the binding layer) will be affected by bleach, creating a black “rub off.” After exposure to bleach, a light sanding of SIS-440 Caulking will restore its normal properties, and the caulking will continue to be UV and chemical resistant.

RULE #4
NEVER, NEVER, NEVER USE A PRESSURE WASHER

Teak is comprised of hard and soft wood. A pressure washer will destroy the soft wood, leaving deep ridges in the deck that will collect water and debris. The life of teak decks is significantly shortened by pressure washers. So, they should never be used.


TEAKDECKING SYSTEMS CLEANERS ARE DEVELOPED

SPECIFICALLY FOR TEAK DECKING


ECO-100 (powder) and ECO-300 (liquid) are gentle, effective cleaners developed specifically for teak decks. They are eco-friendly, acid-free cleaners designed to be thorough, yet gentle. Both the powder and liquid formulations meet the requirements of Florida’s Clean Marina Program and are MARPOL-compliant.


ECO-100 (POWDER)

This concentrated teak cleaner mixes easily with water and contains no acid, caustic sodas or phosphates. It cleans and brightens without removing the soft fibers of teak. It removes mold and mildew and is economical.


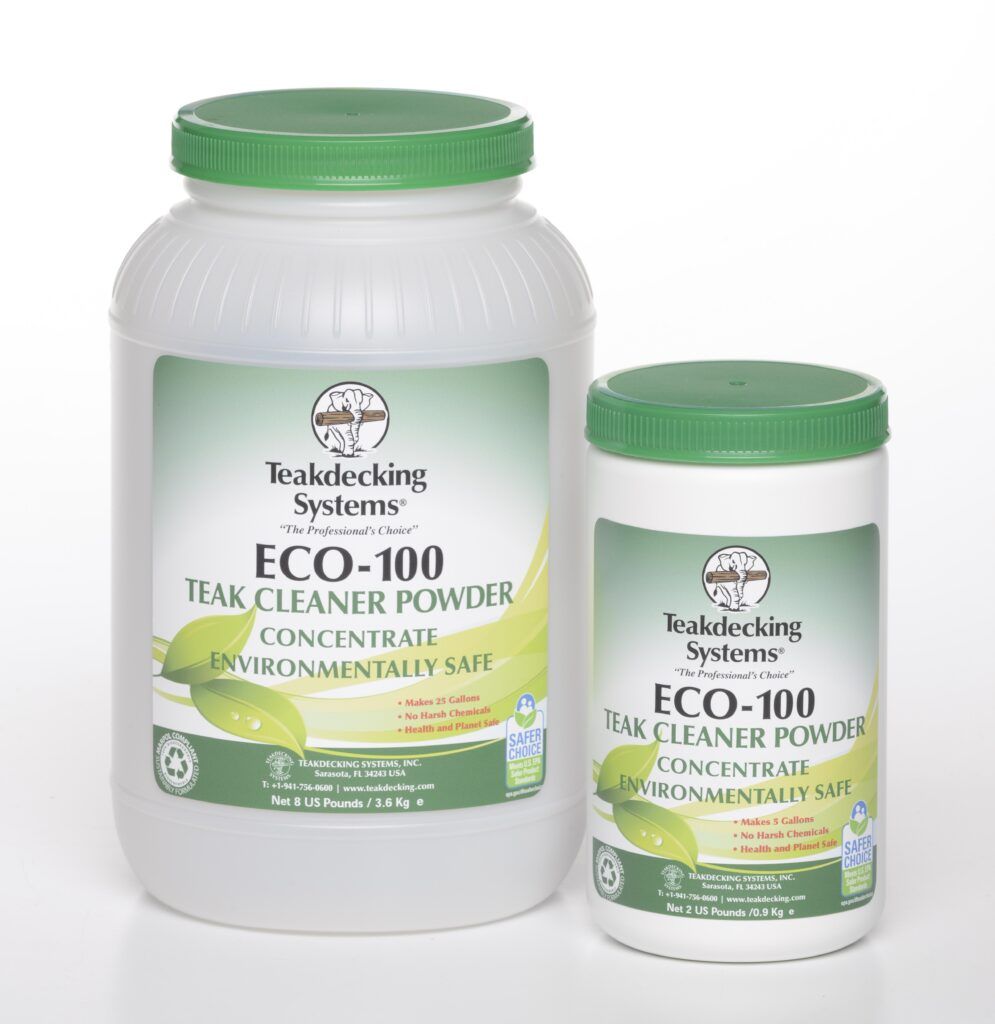
ECO-100 Powder – Mixes Easily with Water
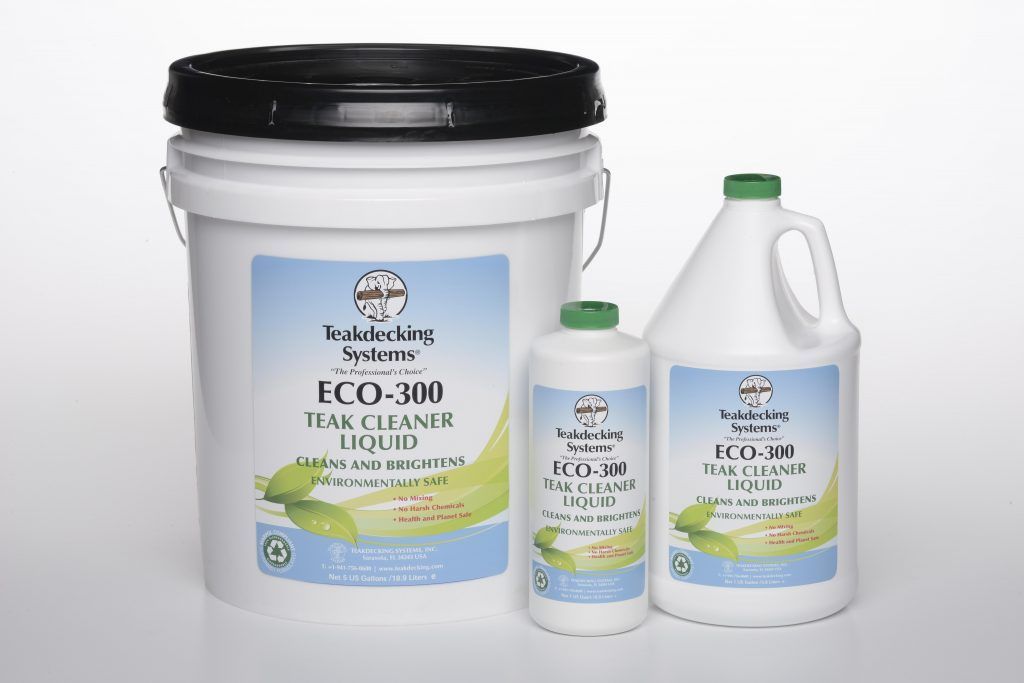

ECO-300 (LIQUID)

This ready-to-use cleaner has the same benefits of ECO-100 but does not need to be mixed with water. It adheres to the scrubbing pad and is ready-to-use. ECO-300 has strong brightening agents that can restore teak to its original color.

USER NOTE: ECO-100 is commonly the first choice for cleaning decks. If a brighter finish is needed, then ECO-300 is used as a second step.


ECO-300 Cleans and brightens teak


Learn more about teak decking in these articles:

How to Extend the Life of Teak Decking

How to Assess Teak Decking Quality

How to Inspect Teak Deck Caulking and Seams


Watch this video on how to clean teak decking:

Cleaning Video on Facebook


QUESTIONS

941-756-0600 and press “1”

products@teakdecking.com


ALL PRODUCTS

May 26, 2025
Can I touch up sunken caulk after it has been applied incorrectly? Yes, you can apply additional caulk over areas that have settled after the initial application. Best Practices for Re-Caulking: 1. For Older Installations: If the existing caulk has been in place for an extended period and has fully cured or “seasoned,” it is best to prepare the seam before applying more caulk. The recommended method is to cut a shallow “vee” (V-shaped groove) into the existing seam. This increases the surface area for better adhesion. After veeing the joint, thoroughly wipe the area with a clean rag soaked in acetone, then apply the new caulk. 2. For Newer Installations: If the caulk was applied recently (within a week or two), the surface is still fresh and may not require veeing. In this case, simply clean the area with acetone and apply additional caulk directly over the low or settled spots. General Reminder: Regardless of the age of the installation, always clean the surface with a rag soaked in acetone just before applying new caulk. This ensures a clean, contaminant-free bonding surface and helps the new caulk adhere properly.
April 28, 2025
How To remove old caulking from your deck and & Re-Caulk your Seams
By Anella Alcott April 11, 2025
If you're planning to get a new deck on your boat, and you've chosen teak, a composite deck, or a cork alternative, this guide will walk you through the full process, from digitization and manufacturing to final installation so you’ll know exactly what to expect from start to finish. TEAK DECKS Digital Templating The first stage involves one of our technicians digitially templating the area using the latest in precise measuring technology. Our team digititally templates vessels all around the world. Engineering Our experienced designers are masters of creating beautiful and technically precise decks using CAD construction program, importing data provided by our digital templating team. Our designers’ exceptional ability to create visual symmetry ensures impeccable finishes and beautiful aesthetic decks. Manufacturing TDS panels are manufactured in our factory utilizing jigs that are adjusted to conform to the vessel’s shape. Teak planks of the required thickness and width are carefully hand inspected, scrutinizing each plank for grain orientation, mineral deposits, or imperfections such as a small knot. The planks are placed into the jig in such a way that the finished deck will have a uniform butt joint pattern. Creating a Watertight Barrier A phenolic or fiberglass backing is securely vacuum bonded to the teak, using our own epoxies that guarantee durability, flexibility, strength and reliability. The exceptional bonding strength, ensures your deck stands the test of time. After the epoxy cures, the newly formed panels are removed from the jig, and the seams between the planks undergo routing, cleaning, and caulking. Margin Trim Once the caulking is cured, the final step involves laying out the teak deck and laying all the margin trim. Upon completion, the finished deck undergoes a thorough quality inspection, ensuring it aligns precisely with the template. Transport & Installation The finished deck panels are placed in custom-made crates and then shipped and installed worldwide. Prior to the arrival of the new deck, the old deck is removed. Our installers inspect for any issues such as water intrusion, delamination, or corrosion on the vessel’s surface. If such issues are found, the areas are repaired before the new deck is installed. Caulking & Sanding Once the deck has been bonded to the vessel, it is time to caulk using our own proprietary, UV, and chemical-resistant caulking TDS SIS-440. After curing, the deck is then ready to be sanded. The entire deck is sanded with 36 grit to remove excess caulking, followed by 60 and 80 grit to enhance the look of the deck. COMPOSITE DECKS Digital Templating The first stage involves one of our technicians digitially templating the area using the latest in precise measuring technology. Our team digititally templates vessels all around the world. Engineering Our experienced designers are masters of creating beautiful and technically precise decks using CAD construction program, importing data provided by our digital templating team. Our designers’ exceptional ability to create visual symmetry ensures impeccable finishes and beautiful aesthetic decks. Manufacturing Every composite decking panel is custom made to perfectly fit the areas to be covered. The panels are delivered with completed seam pattern, sanded and ready to be glued down on most structural surfaces. In the case of SeaSole, the deck is installed using the “peel and stick system”. We use a combination of our TDS bedding and bonding adhesive, along with TDS two-part, flexible epoxy fitting glue, to secure the panels in place. The caulking in the seams is our TDS proprietary patented filler, an enduringly elastic, solid rubber polyurethane joint sealant. Our team will first carry out an inspection of the boat to identify the best application method for each area. Quality Control Once the caulking is cured, the final step involves laying out the composite deck and building all the margin trim. Upon completion, the finished deck undergoes a thorough quality inspection, ensuring it aligns precisely with the original template. Installation The finished deck panels are placed in custom-made crates and then shipped and installed worldwide. Prior to the arrival of the new deck, the old deck is removed. Our installers inspect for any issues such as water intrusion, delamination, or corrosion on the vessel’s surface. If such issues are found, the areas are repaired before the new deck is installed. C ORK DECKS Digital Templating The first stage involves one of our technicians digitially templating the area using the latest in precise measuring technology. Our team digititally templates vessels all around the world. Engineering Our experienced designers are masters of creating beautiful and technically precise decks using CAD construction program, importing data provided by our digitizing team. Our designers’ exceptional ability to create visual symmetry ensures impeccable finishes and beautiful aesthetic decks. Manufacturing Every cork decking panel is custom made to perfectly fit the areas to be covered. The panels are delivered with completed seam pattern, and ready to be glued down on most structural surfaces. Our team will first carry out an inspection of the boat to identify the best application method for each area. Creating a Watertight Barrier After the adhesive cures, the seams between the planks undergo routing, cleaning, and caulking. Installation The finished deck panels are placed in custom-made crates and then shipped and installed worldwide. Prior to the arrival of the new deck, the old deck is removed. Our installers inspect for any issues such as water intrusion, delamination, or corrosion on the vessel’s surface. If such issues are found, the areas are repaired before the new deck is installed. We use a combination of our TDS bedding and bonding adhesive, along with TDS two-part, flexible epoxy fitting glue, to secure the panels in place.
ALL ARTICLES